Fabric Physics

I began this movie project around the time Unreal Engine 5.4 was released. UE 5.4 included a big update for Chaos Cloth, which introduced the ability to export clothing assets from Marvelous Designer to Unreal Engine and simulate them in UE using the garment simulation properties defined in MD. So, my original plan was to create the cloth assets in Marvelous Designer and simulate them in Unreal Engine using Chaos Cloth.
I learned a lot about the Marvelous Designer - Chaos Cloth workflow, and I'm glad I did. But, ultimately, I decided to go with a more established workflow, which is to simulate the clothing in Marvelous Designer and send a Geometry Cache back to Unreal Engine via LiveSync. I found this method more intuitive and, so far, it has produced better results for me. I will cover what I learned about the LiveSync/GeoCache workflow at the end, but I think the Chaos system in UE is worth exploring, so first I want to share what I discovered on that front.
Knowledge Base
The key guides for Chaos Cloth are written by Epic's Tim Brakensiek.
The tutorials on his page extend back to the early days of Chaos Cloth. I personally started with the 5.3 guides and then moved onto 5.4. One caveat: the Chaos Cloth system has been significantly updated in each of the recent UE versions. I don't recommend trying to follow a guide for an earlier version of Chaos Cloth in a newer version of Unreal Engine.
According to the updated 5.5 guide, Epic is working towards integrating their physics asset generation (Chaos Cloth, Chaos Flesh, Geometry Collection fracturing, etc.) into a universal Dataflow editor, slated for UE 5.6.
It is possible that a comprehensive guide will be released with 5.6, so it might be worth waiting until then to dive into Chaos Cloth.
But, if you are interested in digging into what they have released so far (and possibly having a leg up when the 5.6 system is released), I would recommend working through the following tutorials by Tim Brakensiek.
For UE 5.3:
For UE 5.4:
- Panel Cloth - Editor Walkthrough & Updates
- Panel Cloth - Dataflow and Collision Updates
- Panel Cloth Example Files
For UE 5.5:
In addition to Tim's tutorials, there was a batch of great resources for both Unreal Engine and Marvelous Designer released with UE 5.4.
This page explains the Talisman Metahuman Template and directs you to some downloadable cloth assets: the Captain Roux jacket and the Captain Elli sweater.
The process for downloading these assets is a bit cumbersome, but it is valuable to reference working Chaos Cloth assets to learn how they work.
These two pages contain tutorials that use the Roux and Elli assets:
Finally, Marvelous Designer released their own set of tutorials covering the MD - UE workflow:
Working through all the above guides and poking around in the example assets is a good way to build a base of knowledge. It will also make the next section easier to follow.
The Physical Properties of Virtual Cloth
The key to the Marvelous Designer -> Unreal Engine workflow is the option to include garment simulation data in a USD export. In Marvelous Designer, for any particular fabric, there are a number of physical properties. This video covers many of them:
When a USD that includes garment simulation data is imported by a Chaos Cloth Dataflow, these physical property values carry over. They can be seen in any node that has the blue "imported value" icon.
These icons are explained in one of the Brakensiek-Guides linked above.
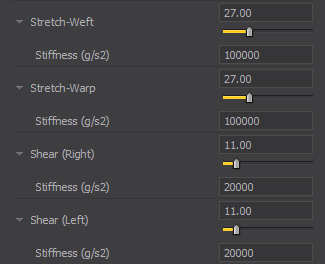
At first glance, the physical property values in the UE Dataflow don't match the values in Marvelous Designer. For example, take a property like "Bending-Weft:"

In MD, for this particular fabric, "Bending-Weft" is set to 51. For most properties, MD has a simple slider with values from 0 to 100.
When this "Bending-Weft" value gets imported in UE, we get a "Bending Stiffness Weft" value of 0.06.

To make sense of this, click the dropdown next to "Bending-Weft" in Marvelous Designer. It will reveal a more precise unit, g * mm2/s2, which is 6000. I believe Unreal Engine is using kilograms and centimeters, or kg * cm2/s2, which explains the conversion to 0.06.

Clicking the dropdowns next to the stretch properties in MD reveals their unit of g/s2. Again, when imported in Unreal Engine, this value will be divided by 1000 for the conversion to kilograms.

The Weight value in MD corresponds to the Density value in the Mass Config node in UE. Marvelous measures in gsm, so the value in Unreal is again converted to kilograms.


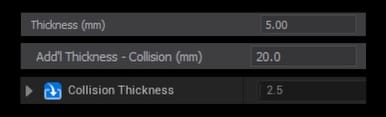
"Thickness (mm)" is another interesting physical property. It shows up in UE in the collision config nodes as "Collision Thickness." The conversion is simply from millimeters to centimeters, but Collision Thickness in Unreal is actually affected by two values in Marvelous Designer. It is the sum of "Thickness (mm)" and "Add'l Thickness - Collision," found in a separate menu called Simulation Properties.
ML Deformer
When I started researching clothing simulation in Unreal Engine, I was confused by the ML Deformer. It was unclear to me how ML Deformer fit into simulation workflows, and how it contrasted with Chaos Cloth.
Another one of Tim Brakensiek's guides, this one on Chaos Flesh, provides some intuition for how ML Deformer works with other simulation systems in UE.
Basically, Chaos Cloth (or Chaos Flesh) assets can simulate real-time physics for lower-poly geometry, but a high-poly mesh is too demanding. For simulating high resolution geometry in real-time, one solution is a ML Deformer:
ML stands for Machine Learning. A ML Deformer uses a learning algorithm (there are many types) to build an efficient model of a large pool of simulation data. First, the physics asset (like a piece of clothing) is simulated in a wide range of motions and poses. This simulation is non-real-time, prioritizing physical accuracy, to create the ground-truth data that the ML Deformer will be trained on. Once the ML Deformer is trained, it can respond to any character movement in real-time, providing a close approximation of the ground-truth cloth physics, even for motions not included in the original training data.
When ML Deformer was first introduced in Unreal Engine, the ground-truth simulation had to be created in other software, like Maya. Now, with Chaos Cloth and Chaos Flesh, UE has added the ability to create the high-fidelity simulation data in-engine. The two guides linked above cover the process of creating a Geometry Cache of the ground-truth simulation data and using it to train a ML Deformer.
For games and other real-time experiences, ML Deformers look to be a powerful tool. But, since I am making a movie, I have the luxury of putting more compute time into each of my frames. I can give the engine all the time it needs (within reason) to run a high-quality simulation. So, why did I decide on simulating my clothing in Marvelous Designer instead of Chaos Cloth? As of now, based on my own amateurish explorations, simming in MD is simpler and more intuitive. Marvelous handles a wider range of clothing with minimal tweaking required. It also supports GPU simulation, and Chaos Cloth is still CPU-based.
LiveSync and GeoCaches
Using the LiveSync plugin, the Unreal - Marvelous - Unreal workflow is simple. Here is a guide on how to set up the plugin:
And here is a brief video on how to use it:
The basic steps covered in this video are:
- Add an A-pose 1-2 seconds before your animation and bake the whole thing to an Animation Sequence.
- Open the Animation Sequence and use the LiveSync option to export the animation and Skeletal Mesh to Marvelous Designer.
- In Marvelous Designer, fit the clothes to the A-posed Skeletal Mesh and then record a simulation for the full animation.
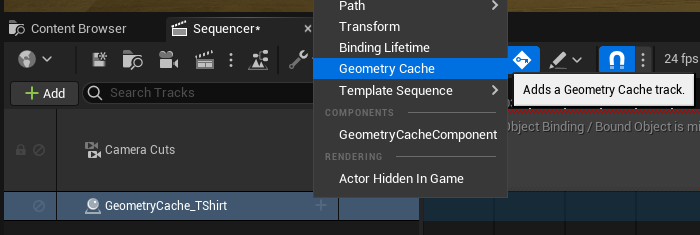
- In Unreal Engine, use LiveSync to import the garment and save it to a Geometry Cache.
That GeoCache can be added to Sequencer to play along with the animation.
In the short video I uploaded in the last entry, Sub/Object Alpha Test, all the clothing was animated using this method.
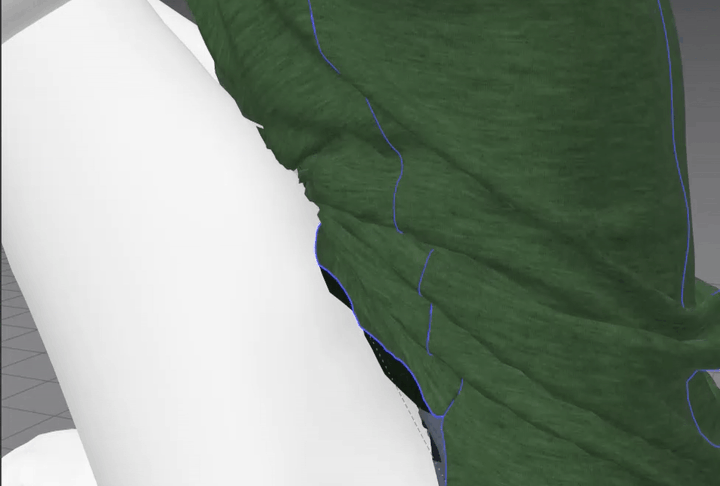
I ran into one significant problem, which was that the character's sitting pose made it difficult to get a clean simulation. Her left leg is pressed against her chest, sandwiching the T-Shirt, and the double collision caused the T-Shirt to do one of these:
After a lot of trial-and-error with the simulation and collision settings, I decided the simplest solution was to lop off the leg. Fortunately, this kind of surgery can be done entirely in Unreal Engine!
First, I duplicated the MetaHuman's body Skeletal Mesh.
(The following steps require the Skeletal Mesh Editing Tools plugin to be enabled.)

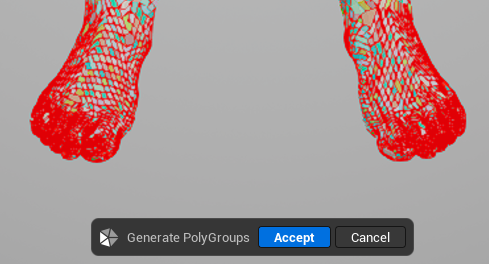
I opened the duplicate SKM and turned on the Editing Tools. By default, the body SKM has only one PolyGroup, and the mesh needed to be divided into smaller PolyGroups so that some could be deleted.
In the left column of the Editing Tools panel, I selected "Edit Skin Weights" and clicked Generate PolyGroups. The auto-generated groups looked okay to me, so I clicked Accept at the bottom of the viewer.

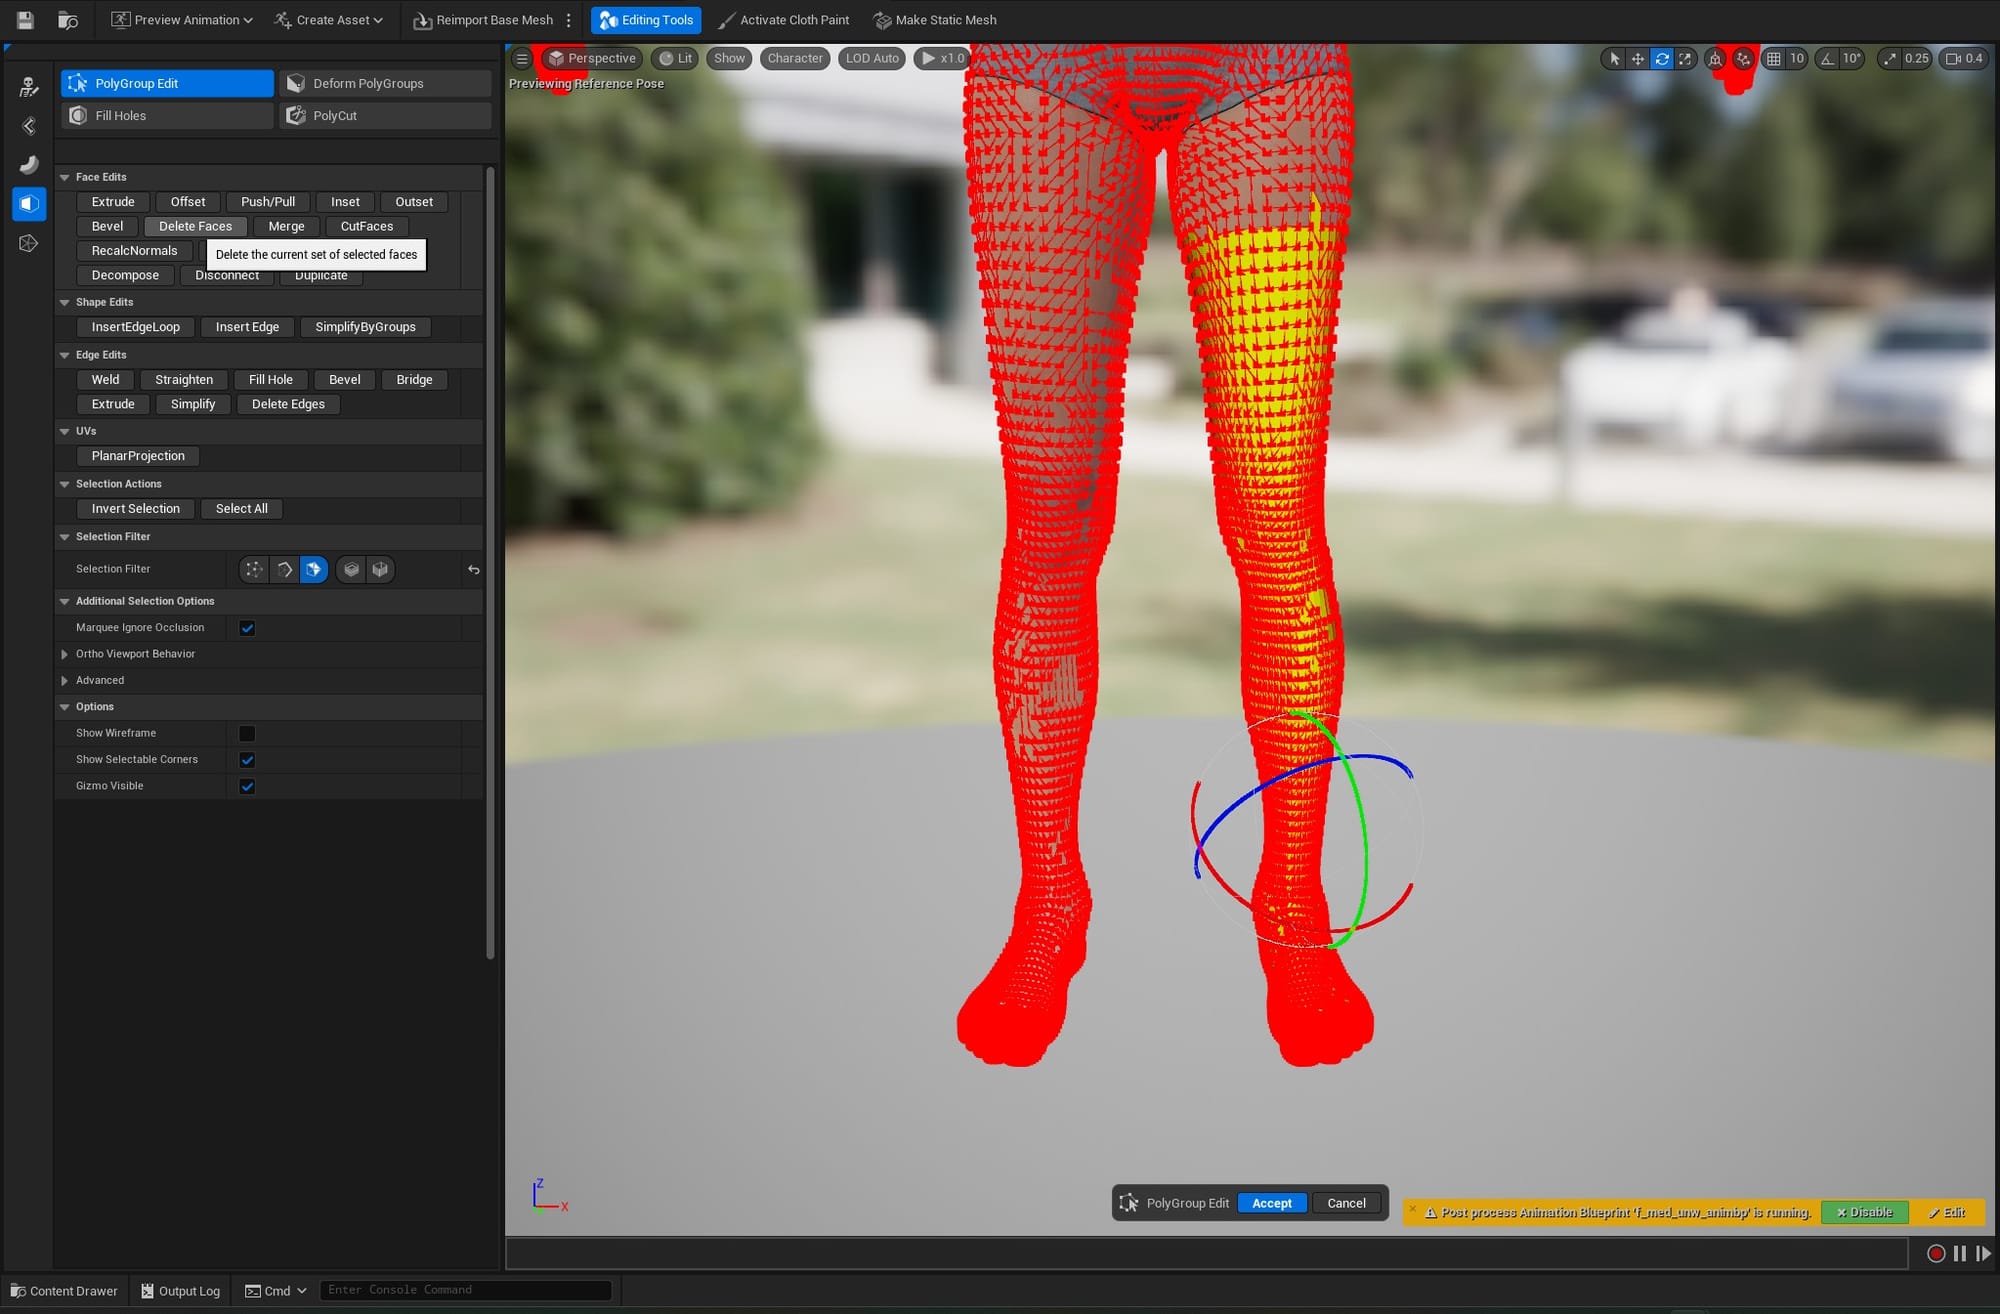
Then, in the Shape Modeling tab, I selected PolyGroup Edit, set the Selection Filter to Faces only, and click-dragged to select most of the left leg. Then, I clicked Delete Faces.
This "hack" was good enough for this mini-project, but in the future I will need a better solution. Many of the scenes in this movie will involve clothing pressed between two collision surfaces, so that is something I will have to figure out.